Friday, 19 February 2016

Lottie's technical File - Braids

Lotties Technical File - Braids!

5 strand -

Overall this was my result of the five strand braid. This braid i felt takes a lot of practise, concentration and patience however once you have mastered the technique creating the 8 and 11 stand plait will be a lot easier to understand. 


Waterfall braid -


I love creating waterfall braids and feel they look so pretty and elegant. To create this hairstyle its just like braiding however you drop a piece down and add a new piece to replace. This braid is very unique with the waterfall effect. 


Lace Braid -

I decided to experiment and do a lace braid for my final braid. I love the way this has came out and feel would look great for a catwalk look as it is something a lot different to what you see on a daily basis. 


Tuesday, 16 February 2016

Lotties technical file - Roller Work

Lottie's Technical file - Hair history! Roller work 

Within this lesson we were taught by Lottie the correct way to apply rollers. To apply rollers you must do this in a brickwork format however this does take a lot of practise to perfect. Once you have heated up the rollers and let them cool down to place into brick work format leave them in the hair for a couple of minutes to create your curl. Once you are ready to remove the rollers gently let loose of the curl. To thicken the curl and to add volume use a back combing tool. I decided to create loose waves from the side of the face as i didn't have much time. 

Below i have added photographs of the lesson and my outcome. 


Eyebrows

Eyebrows!


In todays lesson we were asked to create eyebrow designs and one relating to 2016 spring/summer fashion trends. From this i learnt that bruising the eyebrows back would be a trend i would like to add in my designs with my model Gemma as she has which dominant eyebrows. I feel from the images below my outcomes were successful and loved how we could experiment on each other as we all had different eyebrow textures and shapes.


Smooth and Filled in -


Brushed out 2016 Fashion Trend - 


Monday, 15 February 2016

Dior Glowing Gardens

Dior - Glowing Gardens - 

Spring Makeup Collection 2016


Glowing gardens is theme within the brand Dior for spring and summer. Some of these products include eyeshadows, lipsticks, lip glosses and blusher.Glowing gardens was influenced by the endless beauty of flowers. The makeup is a combination of modern, uncluttered and glowing makeup to bring soft spring glow.

Peter Phillips the creative and image director and Dior makeup who designed this collection to create a luminous beauty look that highlights the aspects of a women's natural beauty. The collection fresh and pure and to focus on bringing a spring glow. The textures are light to create a look the is fresh and natural. The colours of this collection are both vibrant and light with colours such as shades of pink, peony red, soft green and a pastel yellow.


'Dior cultivates the art of a beautiful glow in what are now considered must-haves, inspired by the techniques of professional makeup artists and the products they use backstage, like Lip Glow, the Colour Reviver Lip Balm. This spring, Peter Philips, Creative and Image Director for Dior Makeup, reinterprets the art of a gorgeous glow with a luminous makeup collection that teams new Backstage Pros essentials with eyeshadows and lipsticks in colours inspired by the flower gardens of Granville.'


'It is a radiant collection brimming with elegant, floral colours: Glowing Gardens is a bouquet of light that evokes the charm and springtime luminosity of gardens in bloom. So when the magic of nature inspires the Dior laboratories, their new creations blossom to produce a bright beauty, a glowy complexion, a face enhanced with multicoloured eyeshadows in new and innovative textures. From the 5 Couleurs palette to Dior Vernis, not to mention ingenious products from Backstage and the new Diorshow Colour & Contour eyeshadow-liner duo, this season's makeup is fresh, joyous and profoundly Dior.'

https://www.youtube.com/watch?v=m2PZSzQpbxY


Photography - The use of different lenses

Photography - The use of lenses 

The camera lens is crucial to the quality of the image. If the lens is heavy it is made out of metal and is expensive therefore will produce a good quality.

Focal length on the kit lens zooms from 18-55. Prime lenses do not move as they are built to be perfect at the particular focal length.

50Ml - is good for a close up of models face as so would be the 60 and 85ml
100Ml - Macro lens, captures detail focusing very closely.

50 Ml Lens - Using the 50ml we were able to capture a close up of the models face in enough detail.


100ml lens - As you can see my partners and i have done an extreme close up of my eye using the 100ml. This helps capture detail close up which you can see in the images below. 


Dior Presentation to Kat and class

My Powerpoint Presentation 

Within the lesson of the 15th of February i was asked to present a powerpoint presentation in front of my class about my chosen brand and what initial ideas i have for my editorial, advertisement and catwalk shoots. Although i find this nerve wracking as i feel i am not a good speaker this is good practise to bring up my confidence levels and share any ideas and inspiration to and from the class.


Tuesday, 9 February 2016

Adding accessories into hair!

Adding accessories into hair


I feel accessories can change the hairstyle completely. Accessories can help giving of an elegant classy look using clips and pearls or can make the look colourful using ribbons. I decided to use a variety of accessories into the hair and experiment with which ones look best and the placing. 

Equipment needed - 
1) Pintail comb
2) Sectioning clips
3) Booby pins and hair bands
4) Waterspray
5) Accessories

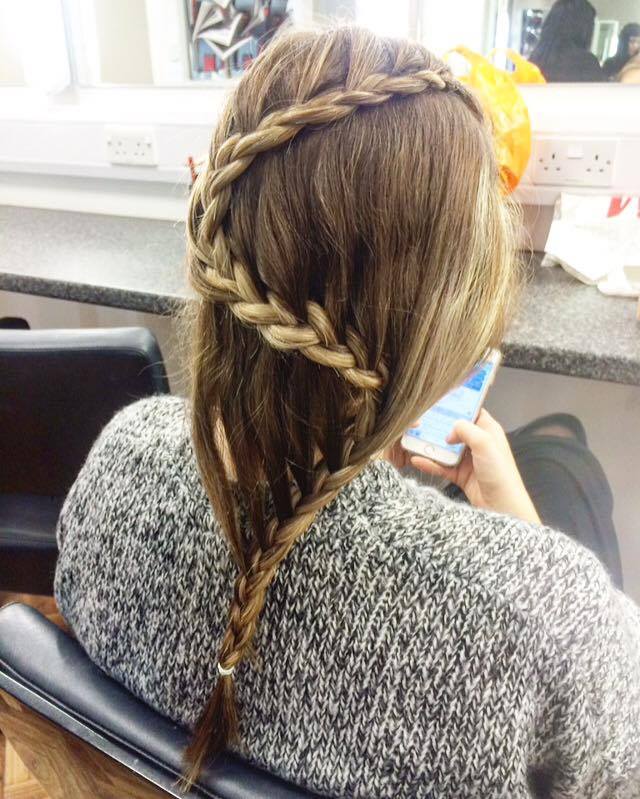
To begin i created a chignon up do. 
1)I started by section the front section of hair and bringing it down the side of the head by creating a braid to join at the back.
2)I then used my waterspray bottle and the top half of the head and smoothed down with a pintail comb and pinned into place using bobby pins until the hair was secure. 
3)Afterwards i curled the bottom half of the hair around my fingers to create a loop using the pintail comb and pinned and hairspray into place. 
4) Finally it was time to add the accessories. 

My final images - 

Butterfly clip - 


Star clip - 


Diamond clips - 


Heart clips - 


Overall i loved creating this hairstyle and enjoyed experiment with all the different accessories. I would definitely like to try again with ribbons and jewels. I had never created a chignon before and am pleased with the way it came out. It was interesting to see how each assessory changed the look and i personally felt the diamond and stars came out the best. I loved these accessories as i feel they really made the hairstyle pop.


Wednesday, 3 February 2016

Catwalk Contour

Catwalk Contour - 


In todays lesson we were taught how to contour the face and where to create shadows and highlights on the face.


1) Blush: Colour and texture (liquid, cream or powder) different tones and additional shimmer bricks. 
2) Highlighting: Powders, liquids, creams or using a lighter concealer.
Cheekbones/lips/eyes/nose/brow bone/inner eye - contouring naturally - light pushes forward, ass to where the natural light hits the face. Not too much but just enough to enhance and bring out the natural shades. 
3) Bronzers: Creams and or powders
4) Mixing products: To get your desired look and to get the product wanted e.g. dabbing lipgloss or mixing eyeliner or powder to a moisturiser to create a cream contour or bronzer.
5) Powders: Use a translucent for a real matt effect. To create a dewy look, finish areas of the face with light dusting, the face should already be highlighted. Assess the end and compliment the finish. 
6) Look closely at the different elements of shine and glow and creating different looks with different powders. 

My contour done on my classmate Maddy


As you can see from the photographs above i have highlighted all areas of face which bring a natural glow.I have put highlighter above the cheek bone, above the brow and down the spine of the nose. For a darker contour i have used bronzer on the cheek bones, top of the forehead and each side of the nose to make the nose appear to be slimmer and longer. I found finding a image to help guide me was very useful so i could understand what shades go where to help bring the desired look i wanted.